Krazy Kings Pom-Pom Craft

As an ‘alternative’ to Halloween, our church puts on an evening of energetic games and crafts, with – of course – lots and lots of sweets for local kids. The past few years, the theme has been ‘Krazy Kings’ of the Bible, with an amusing panto-style play telling the story of a different king from the Bible (there are some pretty crazy escapades among them!). So of course, all the crafts are ‘king’ themed, and as ‘krazy’ as possible.

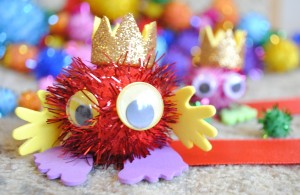
I was asked to run one of the crafts, and having done paper-bag puppet kings last year, I wanted something a little different. The classic crown crafts and decorating biscuits were already taken so I found myself at a bit of a loss. But then came the idea of making these little pom-pom kings, with their very own red carpet (ribbon) to sit on, and lovely crazy googly eyes. I think they’re adorable.

Pom-Pom Pal Kings

Although they look pretty fiddly and complicated (the big one pictured is only about 5cm across), glue dots and double-sided padded tape make life much easier. Glue dots are pure genius – if you haven’t discovered them yet, go and look them up!

I also used gold glitter self-adhesive foam for the crowns (which I cut into strips in advance: they just had to join them by overlapping the layers at the back and stick them on), and attached everything else with glue dots and tape. The pom-poms, hands and feet and googly eyes were all ordered fairly cheaply online.

I think I enjoyed making the ‘samples’ you see here as much as the kids enjoyed making theirs and it does tick all the boxes – it’s sparkly, colourful, tactile, and there’s plenty of room for creativity. And, of course, they’re not just for Halloween – I think they would work brilliantly as a ‘3 kings’ craft for Christmas, or any other king-themed activity you wanted.

I hope you enjoy trying these out, and experimenting with your own creative ideas to adapt them however you like.

Card Games for Learning the Bible Books

I was the kind of Sunday School kid who actually liked being given homework along the lines of ‘Learn all the books of the Old Testament and recite to me next week’. There were gold stars waiting for me at the end, after all…

But, once a bit older, I did wonder what point there is in memorising Bible books. OK, it helps us get around our Bibles faster, but everyone seems to use digital Bibles these days anyway. Is it just an exercise to separate the really eager from the not-so-eager?

And then I realised the importance of teaching kids the ‘Big Picture’ of the Bible. It’s not just a collection of easily packaged stories about Giant-slayers and Kings and Princesses, but God’s Word to us, telling us who He is, who we are meant to be and where we are going. And to get that Big Story, kids need to understand how all the little stories fit in.

Learning the books of the Bible can be part of that. When we understand how the different books fit together in categories (Law, Prophets, Letters, etc.) we immediately see the bigger picture of the Bible, and learning the books in order allows us to grasp the general progression of God’s plan from Creation to Jesus to New Creation.

So. That’s all very well. But getting kids to recite the Bible books weekly sounds a little old-fashioned, and well… boring. Thankfully, there are hundreds of great ideas our there on the internet, including songs and, as I’ll focus on now, card games.

Learning Bible Books

I found the cards pictured here on the Kids Sunday School Place at http://www.kidssundayschool.com/362/printables/bible-cards.php. They offer a free printable download of all the Bible books and the categories (Law, Prophets, etc.), and also some great ideas for group games using them.

I adapted some game ideas from there, and from other sites, and thought up a few of my own. (It’s quite possible someone else has already thought these up somewhere.) I’ve tried to focus them in a way that will actually help kids remember over a few weeks playing the different variations:

The basic game is to split the group into two teams (with two sets of cards), and for the teams to race to complete the ordering of the cards.

Variation one (introduction): split the cards up into Old and New Testament as quickly as possible. This one is good for younger ones, as well.

Variation two: put the cards in the order they come in the Bible (either the whole Bible or Old or New Testaments separately) as fast as possible. Give someone in each team a Bible so they can check the order for the first few times. Then take it away after one or two games.

It would be good to repeat this once a week over a few weeks to get it ‘stuck in their memories’.

Variation three: arrange the cards under the correct category heading (Law, Prophets, Letters…) as fast as possible.

Variation four: once they’ve got a good grasp of the order of the books, give each team member one book card (just pick at random covering the whole Bible or Old or New Testament; don’t worry if you skip books out), and then ask the team to line themselves up so that the books they are holding are in Bible order. As, usual, as fast as possible to beat the other team!

Variation five: randomly divide the Bible books cards between a team, splitting the cards equally between them (so for the whole 66 Bible books, a team of 6 would get 11 cards each). Then they have to put all the cards down as fast as possible in order – so the person with Genesis has to go first, then the person with Exodus, then the person with Leviticus and on and on until Revelation. Again, it’s a race against the other team! Everyone really has to pay attention for this one!

I’m sure there are plenty more variations, but those will get me by for a while with my class, and I hope you find them helpful for inspiring you, too.
Website recommendation: Baker Ross

If you haven’t met Baker Ross, please allow me to introduce you: Reader, please meet bakerross.co.uk. It calls itself  ‘No1 for inspiration’ and it’s not lying. With ready-prepared craft ranges for every topic under the sun, and new ones being added regularly, plus a vast array of craft materials that made my eyes light up with glee, I feel like a child in a sweet shop every time I visit. Or, if that child is anything like the child I was, a child in a – well – craft shop.

When I wanted great, high-quality crafts that commmunicated the Easter message,* and that families would actually want to keep in their houses, Baker Ross provided me with some great inspiration. Mini stained glass windows that even little ones could do – with the special pens (Yes, no paint!) – and Easter cards with cut out crosses, which even the youngest could make into a ‘giveable’ product.

I wanted to make stones (see below) with the Easter message of ‘Jesus is Alive’ (the stone is rolled away), but I really didn’t want to have to be messing with paint. I had visions of pools of muddied paint all over the floor and parents irritable at rocks that refused to dry before home-time. The solution? Paint pens! That dry in 5 minutes. The glittery ones look particularly nice on my example below.

Image

I realise this may sound a little like an over-enthusiastic advertising campaign (which is partly just me enjoying playing with words), but I really do find this website very helpful and so I want to share it. It is affordable and reliable, and I’ve experienced excellent service. And I promise they’re not paying me.

*Baker Ross is not a Christian website, nor a source of exclusively Christian or church resources. It does however, provide a very good range covering the major Christian festivals, and some other topics that may be relevant to Bible crafts, such as ‘Ancient Egypt’.

‘Eggsplore’ Easter Egg Hunt

Eggsplore Egg Hunt (pdf of the sheet children filled in)

I believe the story of Easter is life-changing and so I want to share that with children in a fun and exciting way; because the Bible is fun and exciting! This Egg Hunt is designed to help children grasp the key ideas behind the Easter Story (rather than simply retelling events): that Jesus is the Son of God, that He is God’s chosen Saviour, and that He rose from the dead.

This Bible-based Easter Egg trail was designed for a Good Friday craft and games morning: it is very simple and designed to be quick to complete, aimed at ages 5-7, but suitable for up to 11s. It was one of several activities running: if you wanted to use it as the main focus of an event, you might want to add some more complicated questions.

The basic instructions are on the pdf, but the basic principle is that children answer a question about the Easter story and receive a chocolate egg. Once they have completed a set number (in this case, 5, they receive a ‘prize’ of a bigger egg at the end (we used Cadbury Creme Eggs). The clues to the question answers are found on paper eggs around the trail, which have to be rearranged, counted, etc. to get the various answers. For example, ‘After how many days did Jesus rise from the dead?’ Clue: count the blue eggs in a basket of coloured paper eggs (there should be 3!).

NOTE: I haven’t included templates for the paper egg ‘clues’ you will need. I used about 40 cut from different colour paper. Some I left blank and others I wrote the letters or words needed to complete the clues (eg; K, I, N, and G on separate paper eggs for the answer to the second question). I then arranged the correct letters / words for each clue at each table with some of the blank ones and let the children find them!

This is the egg image sheet I used for the paper egg clues: (courtesy of thegoodbook.co.uk) tee-Eggstra eggs (colour)